Most application's user interfaces can be greatly improved by using images in the TTreeView. Nodes can have different images, this will allow the user to distinguish between node types.
For this example I'll be using 3 bitmaps for the nodes. One for the root, and two for each child node - 1 for when the node is selected and 1 for when it is not.
I'll be continuing with the application started in example 1. The full source for this example (including the bitmaps) is available from the "Source Download" page.
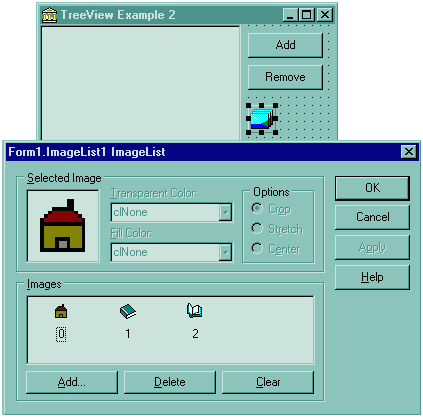
Drop a TImageList component ![]() onto the form. Double click the image list to add the 3 bitmaps. First the root,
then closed node, and finally the open node bitmap.
onto the form. Double click the image list to add the 3 bitmaps. First the root,
then closed node, and finally the open node bitmap.
Your screen should look something like this

Set the TTreeView's Images property to the name of the TImageList, which will be ImageList1 (unless you've renamed it, or have other ImageLists).
Define constants to represent the index of the images in the list. This is useful as it allows you to move the images in the list at a later stage, without having to change every line of code that referances them.
   const
      IMG_NODE_ROOT = 0;
      IMG_NODE_CLOSED = 1;
      IMG_NODE_OPEN = 2;
Here is the updated source for but_Add's onClick event.
procedure TForm1.but_AddClick(Sender: TObject);
var
   sText : string;
begin
      {If nothing is selected}
   if(  tv_eg1.Selected = nil  ) then
   begin
         {Does a root node already exist?}
      if(  tv_eg1.Items.Count = 0  ) then
      begin
            {Add the root node}
         with tv_eg1.Items.AddFirst(  nil,  'Root'  ) do
         begin
            Selected := true;

               {Set the roots image index}
            ImageIndex := IMG_NODE_ROOT;
               {Set the roots selected index. The same image is uses
                  as for the ImageIndex}
            SelectedIndex := IMG_NODE_ROOT;
         end;
      end
      else begin
            {There is a root, so user must first select a node}
         MessageBeep(  -1  );
         ShowMessage(  'Select a parent node'  );
         Exit;
      end;
   end
   else begin
         {Get a name for the new node}
      InputQuery(  'New Node',  'Caption ?',  sText  );

         {Add the node as a child of the selected node}
      with tv_eg1.Items.AddChildFirst(  tv_eg1.Selected,  sText  ) do
      begin
            {Set the image used when the node is not selected}
         ImageIndex := IMG_NODE_CLOSED;
            {Image used when the node is selected}
         SelectedIndex := IMG_NODE_OPEN;

         MakeVisible;
      end;
   end;
end;
As you can see from the source the two properties we're interested in are
ImageIndex and SelectedIndex.
| ImageIndex | Index of the image, in the TImageList, to display when the node is not selected. |
| SelectedIndex | Index of the image, in the TImageList, to display when the node is selected. |
Giving ImageIndex and SelectedIndex the same value is entirely valid. It just means that the node's image does not change when it selected or unselected.
Run example 2 and you'll see what a differance images make to an application.
All information on these www pages is copyright (©) 1997 Andre .v.d. Merwe And may not be copied or mirrored without my permission.